
Pergola vs Gazebo vs Pavilion | Which one to Choose?
Introduction
Looking to upgrade your backyard with a stylish shade structure? As a DIY-savvy homeowner, you’ve probably heard terms like pergola, gazebo, and pavilion thrown around. Each offers a unique design and vibe for outdoor living. In this guide, we’ll break down the differences between these structures, help you choose the right one for your space and needs, and share tips on assembling them (including when calling a pro might be the smart move). Think of this as advice from a helpful neighbor who’s been there, done that, and wants to save you some hassle!
Pergolas, Gazebos, and Pavilions: What’s the Difference?
Pergola
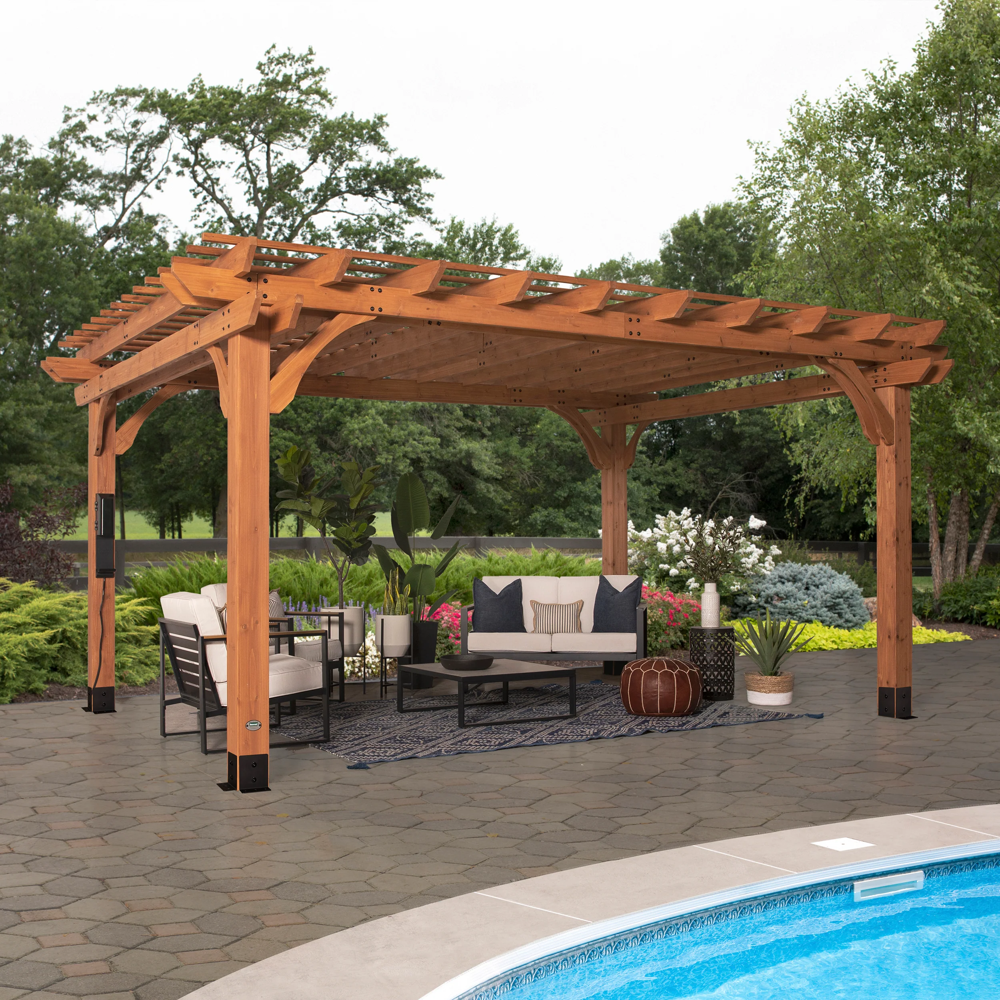
Pergolas are open-air structures defined by their latticed, cross-beam roofs and four (or more) support posts. They provide partial shade – enough to take the edge off a sunny day, but still letting dappled sunlight and breezes through. Rain and full sun can still come through a pergola’s slatted roof, so it’s more for ambiance and light shade than all-weather shelter. Pergolas are popular over patios, decks, or beside pools to create a relaxed, tropical or Mediterranean vibe. You can even attach one to your house to cover a deck or hot tub. Materials range from natural woods like cedar or redwood to low-maintenance vinyl and aluminum kits. Pergolas are typically rectangular and have open sides, essentially functioning as a trellis-like canopy for climbing plants or hanging lights. They’re usually more affordable and simpler in construction than gazebos or pavilions (fewer materials and no solid roof). In short, a pergola adds style and a touch of shade, creating an inviting nook without completely blocking out the outdoors.
Gazebo
Gazebos are the classic backyard showpiece – think of the charming octagonal structure in a park or garden. A gazebo always has a fully covered, solid roof, often with a distinctive pitched or pyramid shape that looks the same from all sides. This means gazebos offer full shade and rain protection overhead. They are usually freestanding (not attached to a house) and traditionally come in octagonal, hexagonal, or oval shapes, though you can find square or rectangular gazebos too. Most gazebos have partially enclosed sides – typically railings or low walls, and sometimes built-in seating around the interior. Many homeowners add screens or curtains to gazebos for bug protection or privacy, essentially turning them into a cozy outdoor room. Thanks to the solid roof and optional enclosures, a gazebo creates a more intimate, sheltered space – perfect as a quiet retreat for reading, an outdoor dining spot, or a focal point for events like weddings. The design leans toward traditional and ornamental (picture a Victorian garden gazebo), which can add a classic charm to your yard. Gazebos are typically made of wood or vinyl for the posts and frame, with roofs of wood shingles, metal, or polycarbonate panels. You can also find metal-framed gazebos (aluminum or steel) with hardtop roofs – common in kit form at home centers – or soft canopies. Overall, if you want a fully shaded, weather-resistant hub for outdoor lounging that feels like a little getaway, a gazebo is a top choice.

Pavilion
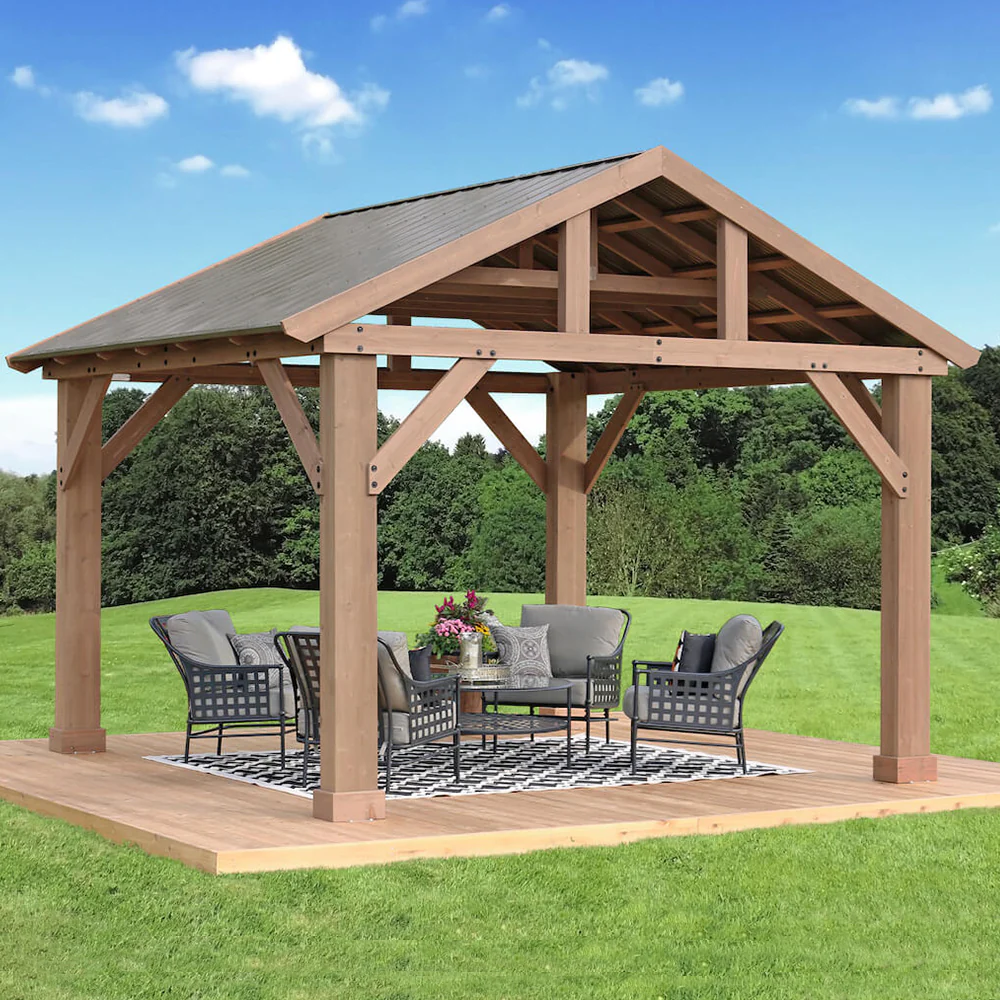
Pavilions are like the gazebo’s big brother – a fully roofed structure with open sides. If you imagine a park pavilion or a large picnic shelter, you’re on the right track. A pavilion has a solid A-frame or gable roof (often a classic two-slope roof peak, like a house roof) supported by posts. Unlike gazebos, pavilions are almost always rectangular or square in shape (no fancy octagons here). They typically do not have a built-in floor or any walls – just a roof and open air all around (though you can add privacy walls or screens if desired). The open design keeps sight-lines clear across your yard. Pavilions provide complete sun and rain protection under their roof, making them excellent for covering large seating or dining areas, outdoor kitchens, or even hot tubs. They create a spacious, breezy refuge for entertaining and outdoor living in any weather, accommodating more people or furniture thanks to their larger spans. Pavilions often use sturdy wood beams or vinyl-clad wood for a substantial look, paired with metal or shingle roofs for durability. Visually, a pavilion can be designed to match your home’s architecture or to have a rustic “park shelter” appearance. In essence, choose a pavilion if you want a big, open-air room with a full roof – great for hosting BBQs, dinner parties, or providing a permanent patio cover that feels like an extension of your home.
Summary of Key Differences: Each of these structures has its niche. Pergolas have an open slatted roof (partial shade, decorative appeal) while gazebos and pavilions have solid roofs that give full shade and rain protection. Pergolas and pavilions have open sides, whereas gazebos are semi-enclosed (with railings, screens, or drapes) for a cozier “room” feel. Shape and style differ: pergolas/pavilions are usually rectangular and lend themselves to modern or rustic designs, gazebos are often multi-sided and evoke a classic charm. A pergola is more of a light-filtering pergola for ambiance, a gazebo is a freestanding shaded nook (often a focal point for relaxation or romance), and a pavilion is a larger rain-proof canopy for gatherings and full patio coverage. And if budget is a factor, pergolas tend to be the most budget-friendly option (simpler design and materials), with pavilions and gazebos generally costing more due to their larger size or added roofing materials.
How to Choose the Right Outdoor Structure for Your Needs
Picking between a pergola, gazebo, or pavilion comes down to your space, lifestyle, and what you want out of the structure. Consider the following factors to make the best choice:
Desired Function & Usage: Start with how you plan to use the space. Craving a light-filtered lounge area for sunny days, or a structure to support climbing roses? A pergola might be perfect for that partial shade and open-air feel. Want a completely shaded retreat to cool off on hot afternoons, enjoy a rainstorm without getting wet, or even set up a bug-free dining space? A hard-top gazebo could be your go-to. Planning to host larger gatherings, BBQs, or outdoor family dinners? A pavilion offers the most cover and room to roam – great for accommodating big tables, outdoor kitchens, or a crowd under one roof. Essentially, pergolas = partial shade for more casual use, gazebos = intimate all-weather shelter for smaller groups, pavilions = expansive coverage for entertaining or daily outdoor living.
Yard Space & Placement: Take a good look at your yard or patio layout. Size and shape of the structure will matter. Pergolas come in many sizes and can even be attached to your house, which is handy if you want to extend a patio or deck with a seamless transition. They also work poolside or over a garden pathway. Gazebos are almost always freestanding and often placed as a focal point in a yard or garden. Do you have a nice spot a little away from the house that could become a destination (like a corner of the yard with a view or surrounded by landscaping)? That’s gazebo territory. Keep in mind gazebos are typically self-contained and sit away from the home (think of a little “island” of escape in your yard). Pavilions can go either way: you might build one adjacent to your home over a patio, or set one up as a standalone shelter in your yard. Just ensure you have the space for a larger footprint – pavilions tend to be big rectangles and need a solid level base like a concrete pad or deck to sit on. Also, leave some room around the structure for circulation and aesthetics; for instance, a gazebo or pavilion shouldn’t overwhelm your yard if the yard is small. In tighter spaces, a pergola or a smaller gazebo might fit more gracefully.
Shade vs. Sun & Weather Considerations: Think about your local climate and how much protection you need. If your summers are brutally sunny or you plan to be outside rain or shine, a solid roof (gazebo/pavilion) is a huge plus – it gives full shade and reliable rain cover. Gazebos and pavilions also offer more shelter from wind (you can add walls or screens to gazebos, and pavilions have a high roof that deflects rain off to the sides). On the other hand, if you live in a milder climate or have lots of tree cover, you might enjoy the airiness of a pergola, which allows more breeze and a bit of sun for a warmer, open feel. Pergolas and pavilions don’t trap heat underneath like gazebos can (gazebos’ enclosed roofs can make them warmer unless they have ventilation). If bugs are a big issue in summer evenings where you live, you may lean towards a gazebo since it’s easier to screen in and create a bug-free zone (many gazebo kits come with netting). Heavy snow in winter? A sturdy pavilion or gazebo designed for snow load might be needed – some metal-roof gazebo kits are rated for snow, or you can opt for beefy wood pavilions. Always check if the structure you choose can handle your local weather extremes (wind, snow, etc.). And no matter what, plan to anchor any structure properly to the ground or a concrete slab so a strong wind doesn’t send it tumbling.
Aesthetics & Style: Each structure lends a different look to your yard. Pergolas often give a stylish, modern or Mediterranean flair – their clean lines and cross-beams are very on-trend and versatile. You can dress up a pergola with string lights, hanging planters, or fabric canopies to match your style. Gazebos are all about charm and coziness – they tend to evoke a classic, even romantic atmosphere (imagine a white Victorian gazebo with a couple of rocking chairs, or a rustic cedar gazebo with fairy lights). If your home’s architecture is traditional, a gazebo can echo that; gazebos are a design centerpiece as much as a functional space. Pavilions, being larger, often have a grand, inviting appearance – they can be made to match a modern farmhouse look, a lodge style with big timber beams, or a simple contemporary patio cover. Because pavilions and pergolas usually have straight, angular designs, they can come off as more modern or transitional, whereas gazebos often have decorative elements (turned posts, shingled roofs, maybe a cupola on top) that are more classic. Consider which one complements your house and existing outdoor decor. Also think about landscaping: a gazebo nestled in a garden corner can become a focal point with flower beds around, while a pergola can be integrated along a deck or over an outdoor kitchen without dominating the view.
Maintenance & Durability: Be honest with yourself about how much upkeep you’re willing to do. A wooden structure (common for pergolas, gazebos, and pavilions) will likely need periodic staining or sealing to stay in good shape, especially for gazebos/pavilions with a solid roof (more surface area exposed to rain). Gazebos and pavilions have more roof area that might need cleaning or debris removal. Pergolas, since they’re slatted, actually let rain and leaves fall through – meaning less cleaning (rain can even wash dust off the slats). If you want low maintenance, consider vinyl or aluminum materials. Vinyl pergolas/gazebos won’t rot or need painting (just occasional washing). Metal gazebos with aluminum frames and steel roofs are quite durable too (just watch for any rust on steel parts over time). That said, metal roofs can get hot in sun – check if they have a heat-reflective coating if that’s a concern. Also, as noted, an enclosed gazebo can trap heat – some have a vented cupola on top to allow hot air out. Small details like that can affect how comfortable the structure is and how much maintenance (like painting a wooden roof vs. a metal roof) you’ll have. Overall, pergolas are typically the easiest to maintain (simpler structure), while gazebos and pavilions give more protection but ask for a bit more care in return.
Budget & Installation Effort: Finally, factor in your budget and willingness to build. Pergola kits are generally the most affordable route to go (and you can find a range from budget metal pergolas to high-end cedar ones). Gazebos and pavilions, because they use more material (solid roof, more complex structure), will usually cost more. Also consider any foundation costs – e.g., a pavilion or gazebo might require a concrete slab or deck to sit on, whereas a pergola could potentially be placed on an existing patio or even directly in the ground with proper footings. In the next section, we’ll talk assembly, but keep in mind pergolas are simpler DIY builds on average, whereas big gazebos/pavilions can be a project. If you’re hiring help, a larger structure will cost more to assemble too. So, match the project to your DIY comfort level and budget for both the product and the installation. Remember, any structure is an investment that adds value and enjoyment to your home – you want to get it right for your needs so you’ll love using it for years to come. And whether you go with the breezy pergola, the storybook gazebo, or the spacious pavilion, you really can’t go wrong – all three will boost your yard’s charm and your outdoor living game!
DIY Assembly Insights: What It Takes to Build Each Structure
Once you’ve chosen your structure, the next big question is: Can (or should) I build this myself? As a handy homeowner, you might be up for the challenge – many people successfully assemble pergola, gazebo, and pavilion kits on their own. But it’s important to know what you’re signing up for. Let’s break down the typical assembly process, complexity, time commitment, and tools required for each, as well as common pitfalls to avoid. We’ll also highlight where even seasoned DIYers sometimes call in reinforcements (professional assembly) to save time and headaches.
Assembling a Pergola (Complexity: Moderate)
What to Expect: Pergolas are generally the most straightforward of the three structures to build. Many come as kits with pre-cut wood or metal pieces and hardware. A medium-sized pergola (say 10×10 or 12×12) can often be assembled in a day or less. In fact, some modern aluminum pergola kits are designed for quick assembly – one brand boasts their pergola can be installed in around 4 hours by a couple of people! Of course, that assumes ideal conditions and some experience. A wood pergola kit might take longer, especially if it’s large or if you’re working solo (plan on a full day or a weekend). If you’re building a custom pergola from scratch (not a pre-drilled kit), expect to spend more time on measuring, cutting, and making sure everything is square – possibly 20+ hours of work for a complex design.
Tools & Help: At the very least, you’ll want a power drill or impact driver (there will be lots of screws/bolts), a ladder, a level (critical for making sure posts are plumb and beams are level), a tape measure, and likely a rubber mallet or hammer for coaxing pieces together. Wrenches or sockets are usually needed to tighten bolts. If the kit is wood, you might also need a step stool or extra ladder when lifting heavy beams. Two people minimum is recommended – one to hold pieces in place, one to fasten – especially when raising the crossbeams into position. The good news: pergolas are open-top and relatively lightweight structure, so there’s no heavy roof panels to wrestle. Just be prepared to temporarily brace the posts upright (you can use 2x4 supports) while assembling the top frame.
Assembly Process: You’ll typically start by setting the posts (sometimes on metal anchors that get bolted to your concrete slab or deck). Then you attach the main support beams to the posts, usually two per side. After that, the rafters or lattice slats go on top, creating the signature crisscross roof. Many kits have pre-drilled holes and even marker lines to show spacing, which helps a lot. Always follow the manufacturer’s instructions step-by-step – it sounds obvious, but pergolas can have dozens of similar-looking pieces, and it’s easy to misorient a beam or use the wrong bolts in the wrong place if you’re winging it. Taking time to sort your parts and hardware before you begin can save you frustration later.
Common Mistakes to Avoid: One big mistake is not properly anchoring the pergola. Even though it’s an open structure, a pergola can catch wind and absolutely needs to be secured to the ground (concrete anchors or deep post footings) to avoid shifting or toppling. Don’t skip this step! Another pitfall is failing to ensure your posts are plumb (vertical) and your frame is square before tightening everything. An out-of-square pergola will look twisted and can make installing the rafters tricky. Use that level and measure diagonally corner-to-corner during assembly to keep things true. Also, watch for the orientation of pre-drilled holes – for example, some beams might look symmetrical but need to face a certain way to line up with others. Lay pieces out as shown in the instructions. Lastly, if your pergola is wood and comes pre-stained, it might still benefit from a coat of sealant especially on cut ends – consider doing that before assembly if suggested by the manufacturer (some kits don’t mention it, but protecting the wood can extend its life). Overall, assembling a pergola is very doable for a DIYer who’s comfortable with basic tools. Many find it a rewarding project – by evening, you’ll be relaxing under the structure you built! Just plan, take your time, and recruit a friend to help with the heavy lifting.
Assembling a Gazebo (Complexity: High)
What to Expect: Gazebo assembly is typically more complex and time-consuming than a pergola. Why? Mainly the roof – a hard-top gazebo has many parts (rafters, roof panels, caps) that must be secured overhead, often at awkward angles. A standard gazebo kit (around 10×10 to 12×12) can take anywhere from 6 hours to well over a day of work for two reasonably handy people. Plan for a full weekend if it’s a larger size or if you’re working with fewer helpers. Simpler soft-top gazebos (with a fabric canopy) might be faster – possibly assembled in 4–8 hours – but most permanent gazebos sold at retailers today have metal or polycarbonate hard roofs. For those, budget at least one full day. If it’s a wooden gazebo kit with traditional shingle roofing, assembly can stretch into a multi-day project (wood gazebo kits often have hundreds of pieces and may require roofing work; expect possibly 16–24 hours of labor total).
Tools & Help: You’ll need all the tools mentioned for pergolas (drill, level, ladder, mallet, etc.) and then some. Multiple ladders or even scaffolding can be a help because you’ll be working on the roof structure up high. A socket set or wrench is usually needed for the many bolts. Often, gazebo kits include Allen wrenches for specialty hardware – using a powered hex bit in your drill can speed things up instead of the tiny hand Allen key. At least two adults (preferably three or four) is recommended when raising the roof frame and holding roof panels in place. The roof pieces (metal panels or wood sections) can be awkward and sometimes heavy – having extra hands to support and align parts makes a huge difference. Some DIYers rig up temporary supports or use ladders as a second pair of hands when attaching roof sections.
Assembly Process: Gazebo kits often start with building the base or frame – for example, connecting the posts with perimeter beams, and adding any railing sections. Next, you’ll assemble the roof frame on the ground or partially on the ground (e.g., join the roof rafters to a center hub for a hip roof). This part can feel like a jigsaw puzzle, so follow the diagrams closely. Once the roof structure is ready, it typically gets lifted onto the posts (this is a critical team-lift moment – the roof frame can be cumbersome). After securing the roof frame to the posts, the roof panels or shingles are installed. With metal or polycarbonate panels, you’ll be spending a good chunk of time on a ladder screwing panels to the frame. Make sure to wear work gloves – metal edges can be sharp. Finally, you’ll add finishing touches: the cap/cupola on top, any decorative elements, and accessories like mosquito netting or curtain rods if included. Don’t be surprised by the number of bolts and screws – it’s not uncommon for gazebo kits to have hundreds of fasteners. Take it step by step, and don’t fully tighten bolts until the instructions say to (this allows wiggle room to get all parts aligned).
Common Mistakes to Avoid: Many gazebo DIYers run into trouble by ignoring the instructions or assembly sequence – unlike simpler projects, gazebos have little room for improvisation. Each part is engineered to fit a certain way; skipping steps or mixing up parts can lead to head-scratching later. It’s tempting to jump ahead, but resist that urge. Another common mistake is poor foundation prep. Gazebos need a level, stable base – if you build on uneven ground, the whole structure can be misaligned (holes won’t line up easily if posts are not on the same plane). Take time to level your patio or concrete pad before starting. Insufficient help is another issue – trying to muscle a roof panel by yourself can lead to bent pieces or even injury. Don’t hesitate to call a friend or two (bribing with pizza is a time-honored tradition!). Additionally, not anchoring the gazebo is a big no-no: once built, a gazebo is essentially a big umbrella; if not secured, a strong wind can lift it. All posts should be anchored to concrete or deck with proper hardware. Many kits include anchor brackets – use them. Lastly, don’t forget weatherproofing: if it’s a wooden gazebo, you may need to seal the wood after assembly (or even before, which can be easier for some parts). For metal gazebos, periodically check that screws are tight and touch up any scratches with rust-proof paint. A common DIY oversight is thinking the job is done when the last screw is in – but a few finishing steps (sealant, checking alignment, etc.) ensure your gazebo lasts. Building a gazebo can be challenging, but with patience it’s achievable. Just expect a more involved build than many other DIY projects – and budget the time accordingly so you’re not racing sundown to finish.
Assembling a Pavilion (Complexity: High)
What to Expect: Building a pavilion is somewhat akin to assembling a large gazebo, but usually with a simpler roof shape (typically a rectangular gable roof) and a beefier structure. Pavilions often come in kit form like gazebos, especially the wood types sold through Costco or home improvement stores. Because pavilions are generally larger spans – say 12×14, 14×16, or even bigger – the components can be heavy. Time-wise, a pavilion kit in the 10×12 to 14×12 range might take a full weekend for a couple of skilled DIYers, similar to a wooden gazebo. Larger pavilions (or complex designs) could stretch into a 2-3 day project. Essentially, expect pavilion assembly to be on par with a gazebo in terms of effort: 6-12+ hours of work, depending on size and whether you have help. If the pavilion has a lot of pre-assembled pieces (like pre-built roof trusses), that can save time; if everything is individual pieces of lumber, it’s more labor. As an example, a wood pavilion kit might come with pre-cut rafters, gussets, and hundreds of bolts – preparing and assembling these safely will take significant time. The upside: once done, you have a permanent, park-quality structure.
Tools & Help: Pavilions require the same toolkit as gazebos, often with an extra emphasis on tools for heavy lumber. If using a wood kit, a rubber mallet is useful to coax large beams into position. A power drill (or two) with good battery life is essential – you’ll drive a lot of long screws and lag bolts. Socket wrenches will be needed for structural bolts. Multiple ladders are a must; for a big pavilion, you may even consider renting portable scaffolding for ease of working on the roof (makes it safer when attaching middle sections). At least two strong people, preferably more for certain steps – e.g., lifting a 14-foot 6×6 beam onto posts is not a one-person job. Clamps can be your friend to hold pieces temporarily. One often overlooked need: if your pavilion kit uses long lumber, ensure you have a large, clear area to stage and assemble parts. Sometimes assembling part of the roof on the ground and then lifting it into place is recommended, which definitely requires manpower or even a block-and-tackle pulley setup.
Assembly Process: Pavilion assembly usually goes like this: install the posts/columns first (checking they are plumb and properly anchored to the base). Then attach the main support beams that run along the perimeter, tying the posts together. With the frame up, you’ll build the roof structure. In a gable pavilion, that means setting up the trusses or rafters. Some kits have full truss assemblies that bolt to the beams – you might assemble each truss on the ground and lift it, or piece it together up high. Take care to brace things as you go; as each half of the roof framing goes up, it can be top-heavy until fully secured. After rafters/trusses, you add roof planks or panels. A lot of wood pavilions use tongue-and-groove boards for the roof surface, topped by shingles or metal roofing. This can be time-consuming – placing each board, nailing or screwing it, etc. Alternatively, some have prefab roof panels that save time. Finally, you’ll finish with roofing material (if not already part of panels), like nailing shingles or screwing on metal sheets. Don’t forget any decorative trims, braces, or hardware covers at the end – these make the pavilion look finished and add stability (like corner braces that lock in the structure). Throughout assembly, keep checking alignment – a pavilion has a larger footprint to potentially get skewed if one corner is off. Measure and level as needed.
Common Challenges: The biggest challenge is handling heavy materials safely and accurately. Pavilions are sturdy structures, which means big lumber and big hardware. It’s easy to underestimate the muscle required – for instance, lifting a ridge beam (the top peak piece) can be awkward; you might need 3-4 people or some clever temporary supports. Always think through the lift before doing it – your back (and safety) is more important than rushing a step. Another common issue is misaligned roof beams – if the posts or base aren’t square, you’ll fight the roof assembly. Spend extra time in the early stage making sure your posts are perfectly positioned and the diagonal measurements match (for square). This will make the roof parts fit much easier. Tightening hardware too soon is also a problem; you often need a bit of “play” to get all bolts in for a large structure, so only fully tighten when the instructions say, usually once the whole frame is together. Like gazebos, not prepping the site is a mistake – ensure your concrete pad or deck is truly level and can support the weight. An uneven pavilion is not just cosmetic; it can put stress on joints. One more consideration: working at height. You’ll spend a lot of time on a ladder or scaffold – don’t overreach or stand on the top step, and consider using a harness if the roof is very high and you’re not comfortable. It’s perfectly fine (and smart) to ask for professional help on the toughest parts (like hiring a couple of carpenters for a few hours to set the beams and trusses). Even experienced DIYers sometimes do this for large pavilions, because having an extra pro on site for the critical steps can ensure everything is done safely and correctly. The reward at the end is huge: assembling a pavilion is like constructing an outdoor room. When you finally sit under that solid roof you built, it’s a great feeling.
DIY or Hire a Pro? When to Consider Professional Assembly
Let’s face it – not every project goes as smoothly as the glossy manual suggests. It’s absolutely okay (and very common) to seek professional assembly services for pergolas, gazebos, and pavilions. While we DIY folks take pride in doing it ourselves, knowing when to get help can save time, money, and stress in the long run. Here are a few scenarios and signs that hiring a pro might be the way to go:
Time Constraints: If you need the structure up by a certain date (say, before a big backyard event) and you’re crunched for time, a professional crew can do in a day what might take you all weekend. They assemble these regularly and have the efficiency down to an art. Instead of spending your only free weekend wrestling with parts, you could be relaxing while someone else does the heavy lifting.
Lack of Manpower or Tools: Do an honest inventory – do you have the necessary tools and at least one helper to call on? Professionals will come equipped with all the right tools and usually a team of 2–4 people for these builds. They’ll bring things like extra tall ladders, scaffolding, power tools, and so on. If you’re short on any of these, a pro can bridge the gap. They also know the tricks for tricky parts – like how to align a warped board or adjust a roof panel – which might be hard if you don’t have specialized tools or experience.
Complex or Large Projects: The bigger the structure, the more benefit to having a professional. A small 8×8 pergola kit? Many DIYers can handle that. A sprawling 14×20 pavilion or a deluxe gazebo with a double-tier roof and cupola? That’s edging into pro territory. Structures with a lot of electrical wiring (some pavilions have built-in lighting or fans), or those that need custom fitting (like integrating with an existing deck roof) are also good candidates for professional installers.
Avoiding Mistakes: Assembly mistakes can be more than just frustrating – they can compromise the structure. Pros have assembled countless gazebos and pergolas, so they know the common pitfalls and how to avoid them. For example, they won’t make the error of not leveling the base or will immediately notice if a factory-drilled hole is misaligned and have a workaround. This means your structure is likely to be sturdier and last longer. Improper assembly can lead to wobbles, leaks, or even safety hazards if something isn’t secured right. A pro ensures it’s “done right the first time.”
Physical Safety and Convenience: There’s no shame in admitting that climbing ladders and lifting beams 10 feet in the air is tough work. Injuries can happen if you’re not used to this kind of labor. Pros literally “know how to handle heavy materials safely, reducing the risk of injury” for you and for themselves. Also, they’ll often take care of things like hauling away packaging debris, which can be a truckload for a big kit. Some services even include finishing touches like applying sealant or anchoring the structure to code. In short, you’re paying not just for labor, but for peace of mind.
Warranty and Insurance: One aspect to consider: some manufacturers or retailers offer assembly services with a warranty on the labor. If anything goes wrong due to assembly, they’ll fix it. If you DIY and something fails, it’s on you. Likewise, professional installers usually carry insurance. In the rare event they drop a beam and it cracks a patio stone or they get hurt on the job, you’re not liable – they have coverage. When you DIY, any mishap is your responsibility. For expensive structures, that little bit of extra protection can be comforting.
Many major retailers (Home Depot, Lowe’s, Costco, etc.) have professional assembly add-ons or can refer you to experienced contractors familiar with their kits. There are also specialized assembly companies that focus on outdoor structures. When you hire them, you often get a team that’s built the exact model of gazebo or pergola dozens of times. They often can knock out a project in hours that might take you days. One pro installer notes that because of their experience and proper tools, they can ensure the gazebo is “assembled correctly and safely,” and likely faster than a first-timer.
Cost vs. Benefit: Sure, hiring help is an added cost – typically a few hundred dollars to assemble a pergola, and more for a gazebo/pavilion (depending on size and region). But think about the value of your own time and the potential cost of mistakes. If you spend two days on a gazebo and still need to call a pro to fix a wobbly roof, that’s time and money. In contrast, a pro might put it up in 6 hours while you’re at work, and you come home to a ready-to-use structure. Also, a well-assembled structure is more likely to last and stay under warranty – you won’t inadvertently damage something by over-tightening or mis-drilling.
Where People Often Struggle: From community feedback and installer insights, people often struggle most with the roof assembly on gazebos, the sizing and squaring on pavilions, and the anchoring and leveling on all structures. If you get into your build and feel things are not lining up, or the instruction manual has become bird-cage liner out of frustration, know that you can always pause and call a professional at that point too. It’s better to ask for help than to risk a partially built or improperly built structure.
In summary, DIY can be very rewarding for those with the skill and time – and pergolas especially are a great DIY project. But for more complex builds or homeowners who’d rather enjoy their backyard than assemble it, professional assembly is a smart investment. It ensures your pergola/gazebo/pavilion is safe, sturdy, and looks just like the picture on the box, without any of the “oops” moments in between. As your friendly neighbor advisor, I’d say: weigh your options honestly. There’s no wrong choice – the right choice is the one that gets you enjoying your outdoor structure the fastest and with the biggest smile, whether you built it with your own two hands or hired a trusted pro to do it.
Top Outdoor Structure Picks (Pergola, Gazebo, Pavilion) at Major Retailers
Ready to start shopping? To help you out, here are a few well-rated, popular models of pergolas, gazebos, and pavilions that DIYers and buyers are loving. I’ve focused on options you can find at major retailers like Amazon, Home Depot, Costco, etc., for convenience. These are solid choices to consider (and you can always read reviews on the retailer sites for more insights).
Pergola Recommendations:
Backyard Discovery “Beaumont” 16×12 ft Cedar Pergola – Home Depot / Lowe’s / Walmart. If you want a beautiful wood pergola that’s built to last, the Beaumont series is a fan-favorite. It’s made of 100% cedar with a multi-level trellis roof and sturdy 6×6 posts. This pergola has been proven to withstand up to 100 mph winds (lab tested) thanks to its robust construction. It even includes a unique PowerPort™ in one post, giving you electrical outlets for lights, speakers, or phone chargers – super handy for a modern outdoor living space. The Beaumont pergola comes pre-stained and pre-drilled for easier assembly, and owners report that the instructions are clear and parts fit together well, which is a big plus. It is on the larger side (16×12 feet footprint), but they offer smaller sizes too (12×12, 14×12 etc.). In Better Homes & Gardens testing, this model “impressed us in almost every way” in terms of quality and stability. It’s an elegant, high-quality pergola for those who want a standout piece – perfect over a patio or by a pool. (Approx. price $1,800–$2,300 depending on size; check Home Depot or Lowe’s.)
PURPLE LEAF Aluminum Pergola 10×12 ft (with Retractable Canopy) – Amazon. For a more modern and maintenance-free pergola, the Purple Leaf brand aluminum pergola is extremely popular online (often an “Amazon’s Choice”). It features a sleek dark-brown aluminum frame (rust-resistant) and a sliding retractable canopy made of UV-resistant fabric. This lets you adjust shade as needed – slide it closed for full shade or open for more sun. Reviewers love that it’s sturdy once assembled and offers lots of shade. In a BHG test, a Purple Leaf pergola held up impressively to harsh weather (it withstood temperatures down to –10°F and even snow) without losing integrity. That speaks to its durability. Assembly is manageable for this pergola, but note that the canopy installation can be a bit tricky (feed the fabric carefully to avoid snags). If you want something you don’t have to repaint or seal, this all-metal pergola is a great choice. It brings a contemporary look and is ideal for attaching to a deck or standing over a garden. (Approx. price $1,000–$1,500; available on Amazon, some models available at Costco seasonally.)
Gazebo Recommendations:
Yardistry 12×14 ft Cedar Gazebo (with Aluminum Roof) – Costco / Home Depot. This is a top pick for a wood gazebo kit that tons of homeowners have assembled and loved. Yardistry’s cedar gazebos (often sold at Costco) have a beautiful design with arched corner braces and a hard-top aluminum roof in a coffee-brown color. It’s fully roofed (great for rain and sun) and you can add the optional mosquito netting or privacy panels that Yardistry sells. People praise the build quality and longevity – many report their Yardistry gazebo still looks fantastic years later. The cedar wood is pre-cut and pre-drilled, and all wood is pre-stained in a nice medium-brown tone from the factory. Assembly is definitely a project, but Yardistry has excellent instructions and even video tutorials, which customers found very helpful. It usually takes two people 1-2 days to assemble (plan for the roof panel installation to be the lengthiest part). The result is a gorgeous, permanent gazebo that looks like a custom build. It’s perfect for creating an outdoor living room – put it over a seating set or hot tub, and enjoy. With thousands sold, this model has 4.5–5 star reviews on retailer websites for its quality. (Approx. price $1,900–$2,500; often on sale at Costco. Home Depot carries a similar Yardistry 12×14 gazebo model as well.)
Kozyard “Alexander” 12×12 ft Hardtop Gazebo – Amazon / Home Depot / Wayfair. For a metal gazebo, the Kozyard Alexander is a standout choice and often rated “best overall” in its category. It features a heavy-duty aluminum frame with a handsome dark brown finish and a galvanized steel double roof. That double-tier roof is functional – it’s ventilated for airflow, which helps with wind resistance and keeps the shaded area cooler. This gazebo also comes with built-in mosquito netting and privacy curtains that you can slide along tracks, so you get a 2-in-1 gazebo and screen room. One of its big selling points is durability: it’s rated to withstand high winds and heavy snow (users report it handles winter weather better than soft-top gazebos, with no sagging). It even has integrated rain gutters in the roof design to channel water away. Assembly is a serious endeavor – you’ll want 2–3 people and a full day, as the steel roof panels take time to secure (patience is key). However, the instructions are decent and many reviewers mention that all parts are well packed and labeled. Once up, the Kozyard Alexander looks like a premium permanent gazebo, and requires little maintenance aside from occasionally tightening screws. If you want a year-round gazebo that’s bug-proof and private when needed, this is a fantastic option that combines sturdiness with thoughtful design (sliding curtain system, vented roof). (Approx. price $1,100–$1,400; sold on Amazon and also through other retailers under the “Alexander” name.)
Pavilion Recommendations:
Yardistry 14×12 ft Wood Pavilion with Aluminum Roof – Costco (seasonal) / Yardistry website. For a ready-to-assemble pavilion, Yardistry strikes again with a beautiful wood pavilion kit. This 14×12 pavilion is made of the same quality cedar lumber as their gazebos, pre-cut and pre-drilled, and it features a peaked aluminum roof in a Montana bronze color. With its substantial 6×9-inch laminated posts and sturdy corner gussets, this pavilion is built for stability and style. It’s large enough to cover most outdoor dining sets or sectionals (interior dimensions about 10×10 feet open space). People choose this for the high-end look it adds to their patio – it essentially creates an outdoor room. Assembly-wise, you should be comfortable with big projects or consider hiring out; while Yardistry provides detailed instructions and even an assembly video, it’s a big structure to handle. You’ll be installing heavy roof trusses and many screws. However, every piece is labeled and the kit includes all necessary hardware. Once built, owners love the result: it’s rock-solid and easily attached to a deck or concrete via anchor brackets. This pavilion can transform a deck that bakes in the sun into a fully shaded retreat. Yardistry also offers add-ons like a metal pavilion roof accent and a privacy wall if you want to customize later. Overall, it’s a top pick if you want a permanent pavilion with classy design and retailer support (Costco’s version often comes with mosquito netting included). (Approx. price $2,000–$2,500; often available through Costco’s website or Yardistry directly.)
Backyard Discovery “Norwood” 20×12 ft All-Cedar Pavilion/Gazebo – Home Depot / Amazon. If you have a larger space and big plans (like covering an outdoor kitchen or dual-use as a carport), the Norwood 20×12 is a beast of a pavilion that gets rave reviews for its features. It’s made of cedar wood with a hard-top steel roof that’s built to take a beating. In fact, it’s Pro-Tect™ certified to withstand up to 12,600 lbs of snow load and 100 mph winds when properly anchored – that’s an insanely robust rating, practically commercial-grade strength. This pavilion includes a 5-year warranty from Backyard Discovery, reflecting the confidence in its durability. One of the coolest parts: it has a built-in PowerPort™ with 3 outlets and 3 USB ports, perfect for plugging in lights, a TV, or blender at your outdoor bar. The design is versatile – it’s marketed as a gazebo/carport, so it’s open and tall enough to park a vehicle, but also great for lounging under (plenty of headroom). The Norwood comes in big, heavy boxes, and assembly will require a few people and ideally some experience or extra time. The wood pieces are pre-cut and pre-drilled, and it uses a lot of large bolts for the structure. Many buyers opted for professional install due to the size. But once it’s up – wow! It’s an impressive centerpiece that can handle year-round use. For those in snow country or who want maximum weather resistance, this model is hard to beat. It essentially gives you a permanent outdoor shelter. (Approx. price $4,000–$5,000; available at Home Depot and online; sometimes listed as a gazebo or carport.)
Each of these picks offers a combination of quality, durability, and customer satisfaction. Whether you fancy kicking back under a breezy pergola or throwing a party under a pavilion, these structures can elevate your backyard game. Always check the latest reviews and prices, and make sure the dimensions suit your space. And one more tip: for big-box store purchases, see if they offer assembly services or packages – sometimes you can get a deal on installation when buying through them.
Conclusion
Choosing between a pergola, gazebo, or pavilion comes down to envisioning your ideal outdoor life: Do you imagine sipping lemonade under filtered sunshine and climbing vines (pergola), enjoying a bug-free twilight dinner in a quaint garden nook (gazebo), or hosting the whole neighborhood for a cookout rain or shine (pavilion)? Whatever your dream, there’s an outdoor structure to match. Pergolas bring style and charm with a dash of shade; gazebos offer an inviting sanctuary from the elements; pavilions create a grand covered space for all your activities.
Remember to plan not just for the initial purchase but for the assembly and long-term enjoyment. If you’re a DIY enthusiast, these projects can be incredibly rewarding – just be prepared and take them one step at a time. If you’d rather skip straight to relaxation mode, there’s no shame in calling in the pros to make it happen. The goal is to end up with a safe, sturdy structure that you love using, whether you built it or supervised with a cold drink in hand.
At the end of the day, these outdoor additions are all about enhancing your lifestyle. They encourage us to spend more time outside – grilling, reading, napping, partying, or simply enjoying the breeze. Whichever you choose, you’re investing in an outdoor space that will likely become your favorite “room” of the house. So go ahead, create that shaded retreat or open-air pavilion. Your future self (the one lounging comfortably outside) will thank you. And don’t be surprised when neighbors poke their heads over the fence to admire – you’ll be the friendly expert who can tell them all about pergolas vs gazebos vs pavilions, and maybe even lend a hand when it’s their turn to build one!
Happy building, and even happier outdoor living! 🌞🛠️
Enjoy your new outdoor oasis!